The Banff Winter Photography Guide

A chilly sunrise at the third Vermilion Lake
From its jagged, granite peaks and ancient glaciers, to its alpine meadows and dazzling blue lakes, Banff National Park is one of the most beautiful places in Canada if not all of North America. Every summer the snow on the mountains begins to melt away and the park attracts thousands of visitors who come to hike, paddle, and sightsee their way through the iconic landscape.
Very quickly though the temperature begins to drop again.
After the last of the leaf-peepers head back home at the end of fall, the only people who venture into the park are skiers, snowboarders, and of course photographers. If you’re someone who’s going to be visiting Banff in the winter and want to know how to make the most of your time here, this guide is for you.
The reason I’m making this list (apart from the fact that I’m desperately missing all the snow and ice) is because Banff is quite different in winter than it is in summer. Many trails and roads are closed due to snow or the risks of avalanche so places like Moraine Lake which would be at the top of any visitors list in the summer are actually inaccessible. Simultaneously though, other lakes and waterfalls freeze over and open up new and ever-changing areas to explore.
This list could very easily turn into a comprehensive stock-take of every lake, lookout, and roadside pullout that the park has to offer, so to make things a little simpler the following locations needed to meet a few conditions.
First- Although it goes without saying, the locations have to be beautiful. Beautiful enough that you’d happily set an alarm for 3am, drive for an hour or two in the dark, then go stand around in -20 degree weather just to snap a photo.
Second- Each of these locations needed to be versatile enough so that despite inclement weather, less-than-ideal light, or the presence of other photographers, you can still come away with unique images.
Third- These places need to be accessible to the average tourist. If you’re reading this list then you probably won’t be pulling a Marc Admus and trekking into the Banff backcountry for a few weeks of winter camping, so each of these locations needed to be accessed with only an easy drive and a short hike.
With those parameters I’ve curated a top-five list of the best places for photographers in Banff National Park during winter. Then, at the bottom I also have ‘special mentions’ section where I’ve include some locations that would’ve been on the list if not for one or two caveats.

I spent the early morning of Christmas Day here with my girlfriend and a handful of other photographers.
Vermilion Lakes
This series of three lakes is nestled right next to the town of Banff, between the Trans Canadian Highway and the Canadian Pacific Railway. The view from the highway is very similar to that from the lakeshore: Looking across the water you can see Mount Rundle rise up from the valley floor, dominating the skyline with its slanted and suddenly recognisable form, while the Bow Valley extends out to both the East and West.
I know there may be some people out there who would roll their eyes at these iconic lakes being included here, after all it must be one of the most photographed places in Canada, but its popularity should never deter you from visiting. If anything you should see it as a challenge to try and create a unique image.
When to Photograph: Being so shallow, Vermilion freezes over earlier than most others in the park, usually around the end of October or during November. If you’re looking to capture methane bubbles trapped in the ice, then that’s when you’ll want to visit; once the snow falls they’ll be covered up and your next best option would be Abraham Lake two hours North.
A unique feature of Vermilion Lakes are the warm springs that trickle out from the shore and keep a handful of areas from completely freezing over. Though when I say warm what I really mean is ‘barely above freezing’. Regardless, it’s just enough so that even when the nights are longest and the temperature is threatening to dip towards -40, you can still include a perfect reflection of the distant mountains in your image.
During winter, sunrise occurs behind either Mount Rundle or Sulphur Mountain. If the clouds are high enough then you can enjoy vibrant red and orange hues in the sky, while the snowy landscape in front of you comes into soft pastel tones. Sunset takes place to the right of the scene, meaning that while you can get some light on the mountains in front, the mountains behind you block the sun too early and you miss out on experiencing some proper golden hour colours or alpine glow.
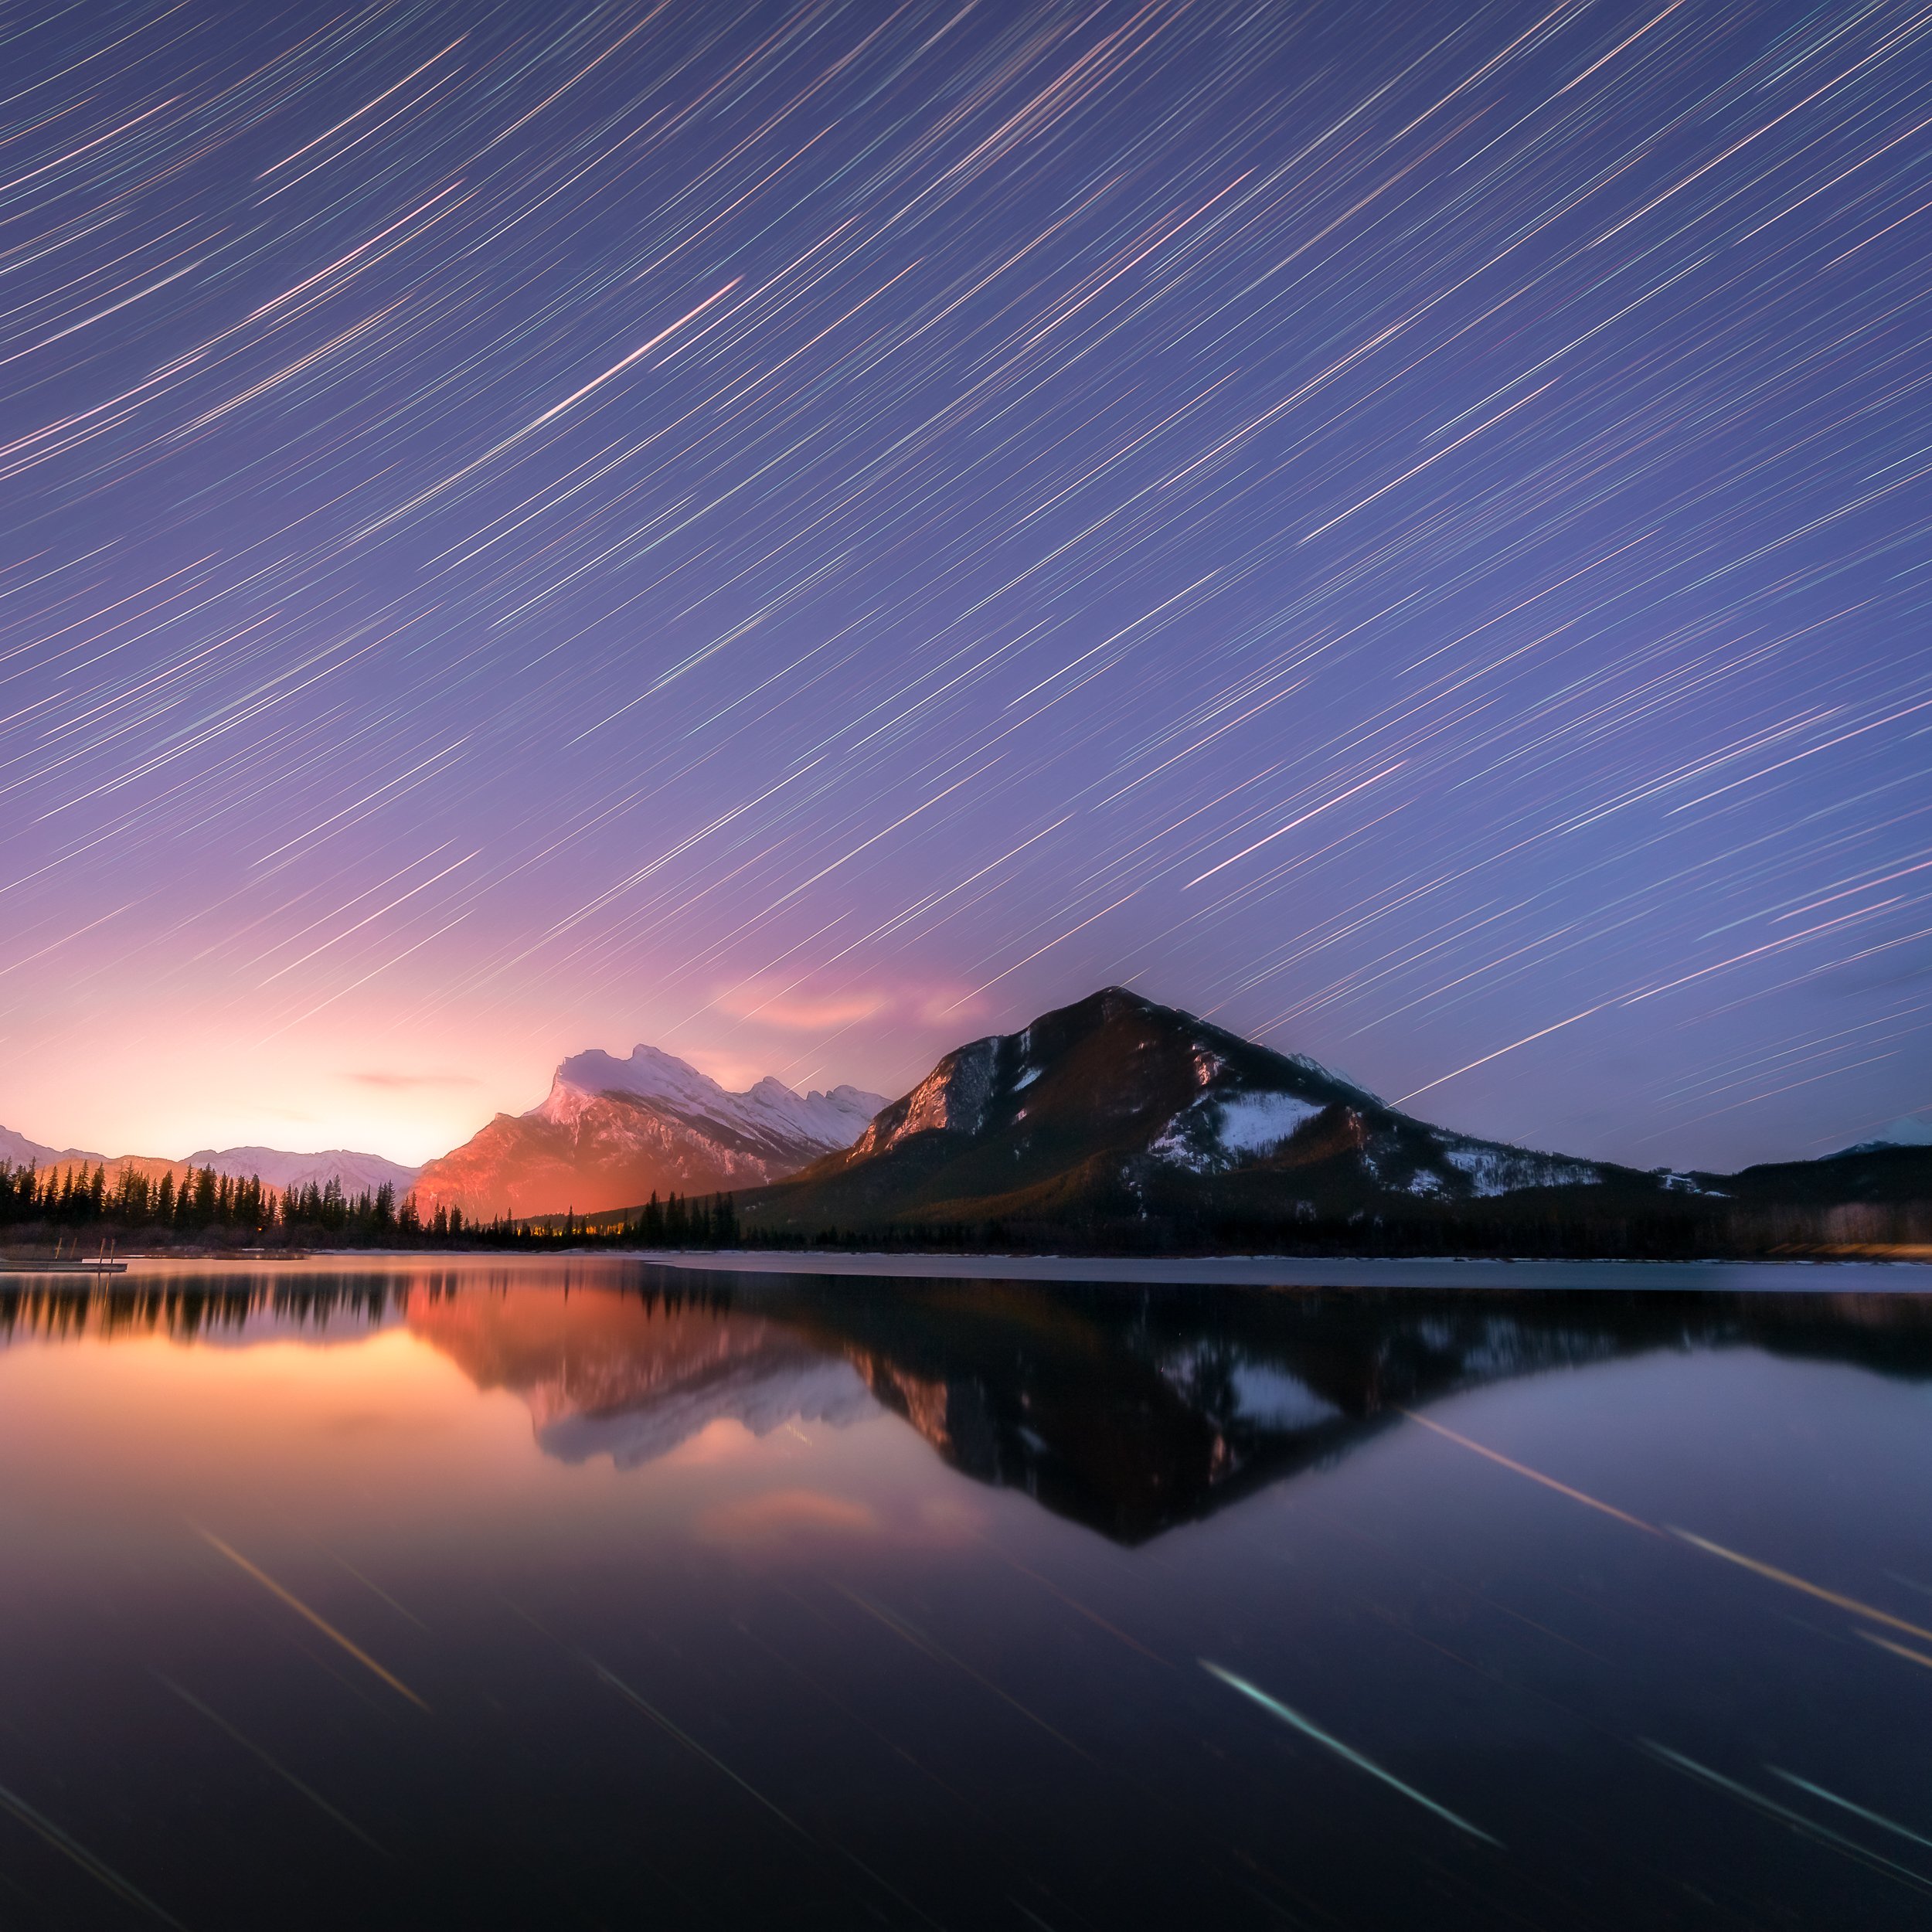
This image is made up of a couple hundred photographs, stacked using software, to create these star-trails.
How to Photograph: The unique combination of snow and ice around perpetual pools of open water is one of the main draws to Vermilion Lakes. When the weather is a little warmer (comparatively) the pools can be metres across, while when it’s colder they may only be the size of your palm. Either way you’ll want to do a little scouting beforehand so you know where these pools are if you’re wanting to include them in your compositions. No pool is like another, they’re different shapes, with different ice formations, and surrounded by different vegetation or rocks. If you visit a pool one day, then return a couple days later, you’ll find a completely different scene. Because the pools are so popular you need to keep in mind that other photographers will be gathering around them, and small pools generally mean less room for photographers. My favourite shots here were often wide, close to the ground, and focus-stacked to really draw attention to the ever changing textures of ice and snow.
Pine trees and deciduous bushes grow around the shore of the lake and can provide elegant, natural frames for the landscape. Depending on the vegetation or time of year, they can also provide a pop of colour against the subdued winter tones.
In the Northern Hemisphere the Milky Way season is summer, but I wouldn’t dismiss astro or night photography at this location. Light pollution from the town blooms up under Mount Rundle and with stars, creates a beautiful backdrop to the landscape. If you manage to catch the lakes in that small window when they’re frozen but still clear of snow, low-level lighting can really enhance your night photography by illuminating methane bubbles that have been trapped in the ice. Banff photographer Paul Zizka is well known for his night images, many taken at Vermilion Lakes, that utilise light and people.
At the first two lakes the skyline focuses on Mount Rundle, but if you move down to the less crowded third lake, suddenly Sulphur Mountain dominates. If you’ve grown tired of photographing at the first two, or perhaps you feel you’ve exhausted your options there, try the third and hopefully it’ll give you an extra shot of inspiration.

I focus-stacked this composition to make the most of the unique clouds and textured ice.
How to get there: While it is possible to walk to the lakes from the middle of town in about 20 minutes, I wouldn’t suggest that. The icy roads and footpaths make the journey a little more hazardous than it needs to be, especially if you’re making the trek for sunrise. Just take your car and head towards Mount Norquay, turning left onto Vermillion Lakes Road before you cross over the highway.
As I mentioned there are three lakes, with the third being a little further on from the first two. Don’t worry about the possibility of missing them as the road will come to a dead end shortly after the third lake and this is where you’ll want to turn around when you’re done for the day. It’s only at the shore for each lake that the road becomes wide enough to facilitate parking, so you needn’t worry about having to walk far to gain access the the shore.

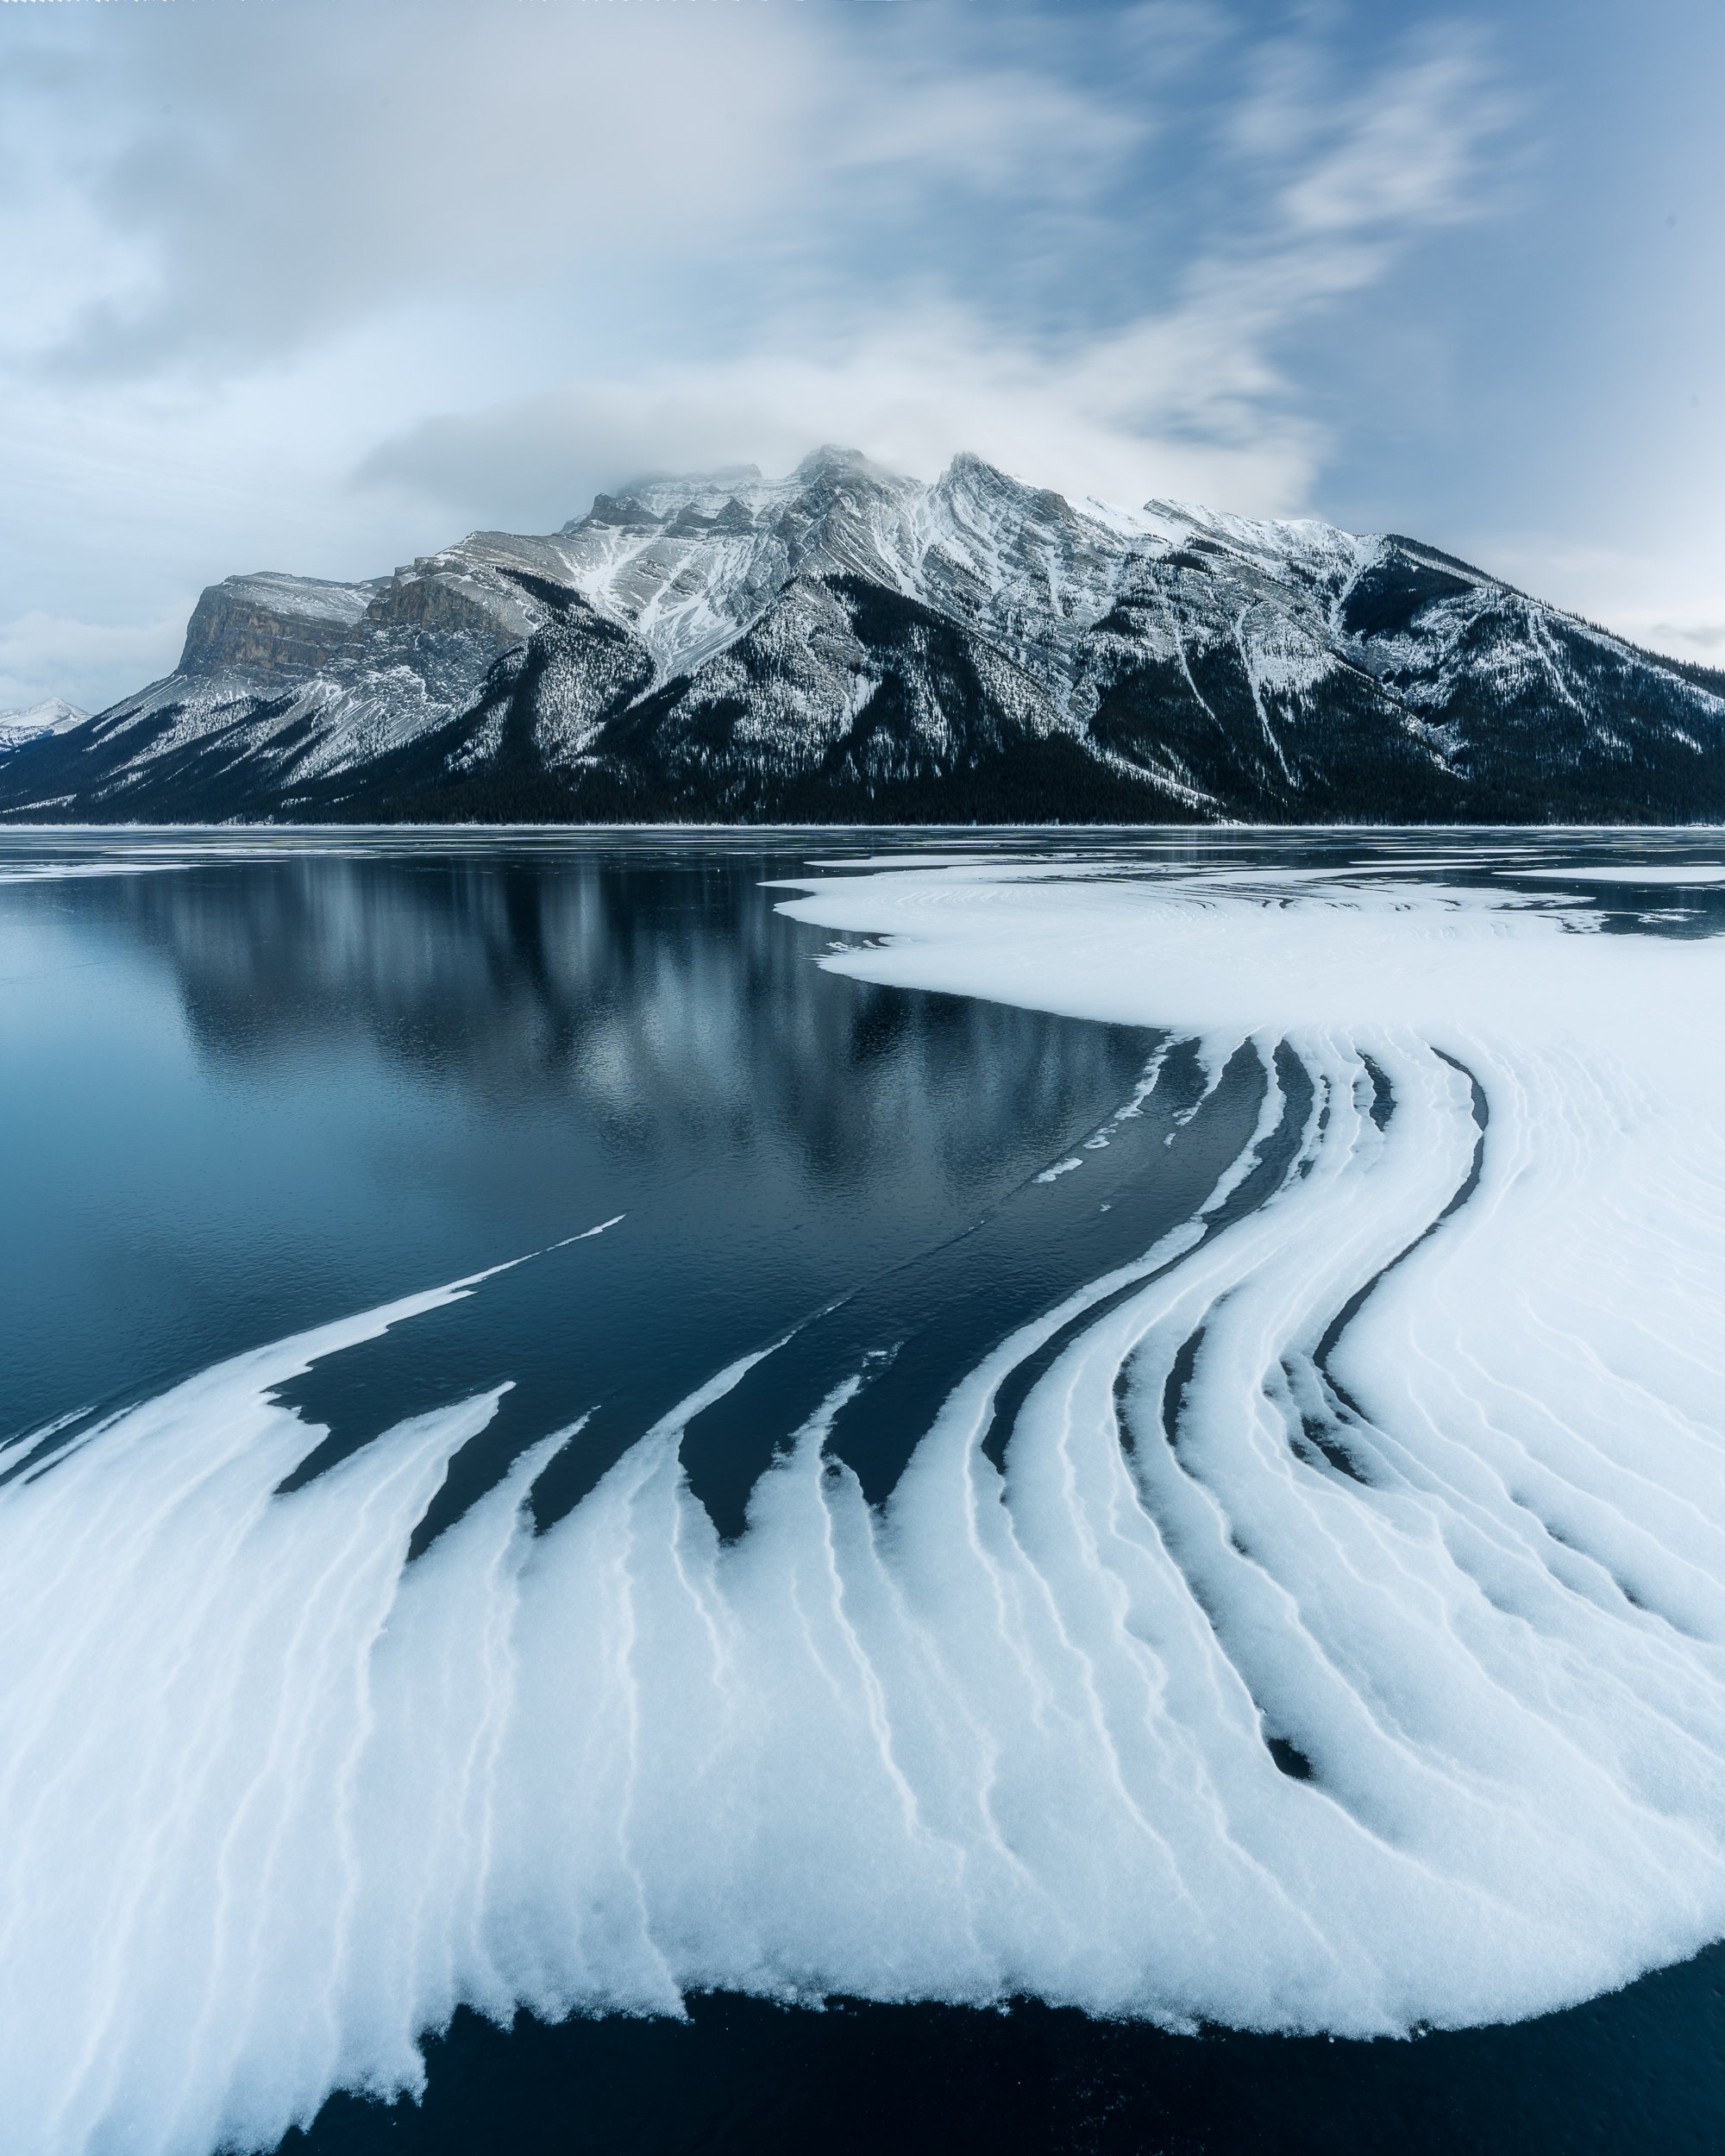
I spent a lot of peaceful nights out on Minnewanka by myself.
Lake Minnewanka
Located to the North East of town, Lake Minnewanka is a big draw for tourists in the summer who come to hike the surrounding trails or embark on short boat tours. The lake is also popular with scuba divers who can find the old dam from 1912 or the remains the old resort village of Minnewanka Landing, both of which were submerged when a bigger dam was built in 1941.
When it first freezes the lake sees a lot of visitors who come to ice skate or play hockey. Once the snow falls however, it’s rare to see anyone venture out onto the lake except for the odd group of tourists who don’t stray too far from the shore.
I rarely visited Minnewanka in the summer, I never found it to be interesting enough even with a vibrant sunset. In the middle of winter though, the lake is a photographers playground. The size of the lake, the intricacies of the shoreline, the changing conditions; All of these come together to provide an infinite amount of subjects to either photograph on their own, or as a small element in a sprawling landscape. I have spent more time at Lake Minnewanka in the winter than I have at any other location in Banff throughout a whole year.
This needed to be a vertical panorama because the mountain was so wide. It’s one of my favourite images from all of Canada.
When to Photograph: Conveniently it’s the lakeshore nearest the carpark and dam that is the first area to freeze over. Barring any significant fluctuations in temperature the ice will eventually spread up to a narrower part of the lake a few hundred metres out. Because of strong winds and choppy water, colder weather is needed before the lake freezes past this bottleneck. You’ll know when it’s safe to head out onto the ice because you’ll have been beaten to it by ice skaters.
Thanks to the strong winds over Lake Minnewanka, light snowfalls are kept off the ice or blown into long, elegant shapes. This means that you have more time at the beginning of winter to photograph the clear ice, at least until heavier snow covers it up entirely.
In winter the sun rises directly behind Mount Inglismaldie on the opposite shore, and in my experience it often cast some great colour over the landscape. Sunsets here can also be beautiful; If it’s clear then you can look down the lake towards the far mountains which will catch the last of the alpine glow. If there are clouds to catch the light in either the morning or evening, you can pretty much look in any direction and find yourself with a stunning composition.

This was my most successful attempt at replicating an image taken by Marc Admus.
How to Photograph: When the water first starts freezing you’ll find plenty of compositions around the rocks on the shoreline, and small details like frost flowers can add interest to your photos. As the lake freezes over more the water level will drop and new compositions can be found again and again in the same areas as more of the shore is revealed and old ice is left behind.
Despite the fact that Minnewanka is glacier-fed, it has a deep, clear, navy colour rather than some of the brighter, opaque blues and greens seen elsewhere in the park. Once the lake is frozen solid you can spend hours upon hours wandering about on the foot-thick ice looking for just the right crack, seam, or snowdrift. The high contrast between dark ice and white snow can be especially eye-catching, regardless of the quality of light.
If it’s getting later in the season and you want to photograph some open water, try the rocky outcrop at the lake’s bottleneck, a couple hundred metres from the carpark. I spent a whole morning here photographing where the lake met the ice. There were some amazing reflections and textures as the water stole back some territory, although I found it a little sketchy trying to get close enough with my camera. There may also be a warm spring here, but I’m not certain. I spent a night at this spot in the middle of winter because it still had a puddle of water over slushy ice and it provided some nice reflections.
As winter continues the ice will become blanketed in snow, the water level will drop, and the ice will lower. There is a cove and an island on the other side of the Parks Canada chairs, and it’s in this space that I’ve found so many ice sculptures to frame photos of the distant mountains. I was originally inspired by a photograph taken here by @colandovision, who was in turn inspired by an image from Marc Admus. I’ll admit that they executed this concept better than I did, but I found the experience of trying to re-create similar images really beneficial. The general idea is to find a small shelf of ice that remains stuck to the shore, fit your camera (with a wide enough lens) underneath, and focus stack the entire scene. It’s a lot easier said than done — I only found success by resting my camera on a pair of gloves, focusing manually, and using the Sony App on my phone to check composition and take photos. You don’t have to try and take a photo like this of course, but there are so many features at this shore to stoke your creativity, so explore the area and see if anything interests you.
I’ve spent so much time here and taken so many photos out on this lake; it holds a special place in my heart. The nights spent silently trekking across its frozen surface and exploring its shore will stick with me forever, and I just hope others appreciate it as much as I do.
How to get there: It takes only twenty minutes going clockwise on the Lake Minnewanka Scenic Drive to get to the carpark, and if you continue the loop you’ll also pass Two Jack Lake on the way out. Depending on the conditions you may also want to stop at a small pullout on the other side of the dam bridge as this offers better views looking down the lake. If you pull into the proper carpark it’s not far to the shore, or you can walk further along, past the Black Anchor snack shack, to a rocky outcrop where you’ll find the pair of red Parks Canada chairs. It’s from here, and continuing further along the shore towards the bottleneck, that I find the most compelling features.

This was taken on my first ever visit to this spot.
Castle Mountain
In my opinion this one of the absolute best locations in the National Park to visit for sunset. Located roughly halfway between Banff and Lake Louise, Castle Mountain is named for its recognisable sheer cliffs, rising from green slopes, which resemble the walls and turrets of a medieval castle. Running in front of the mountain is the Bow River which freezes over in winter and provides endless foreground opportunities.
When to Photograph: Castle Mountain is stunning all year round, but the sunrises and sunsets during winter are the best. At sunrise the light hits the side of the peak which creates a lot of shadow and contrast. Sunset occurs across the valley and lights the mountain more evenly, but almost always with amazing colour. In summer the sunsets are quite similar, however the sun ends up rising too far to the north-east and neither casts nice light over the mountain, nor backlights it pleasantly (yes, I am fussy).
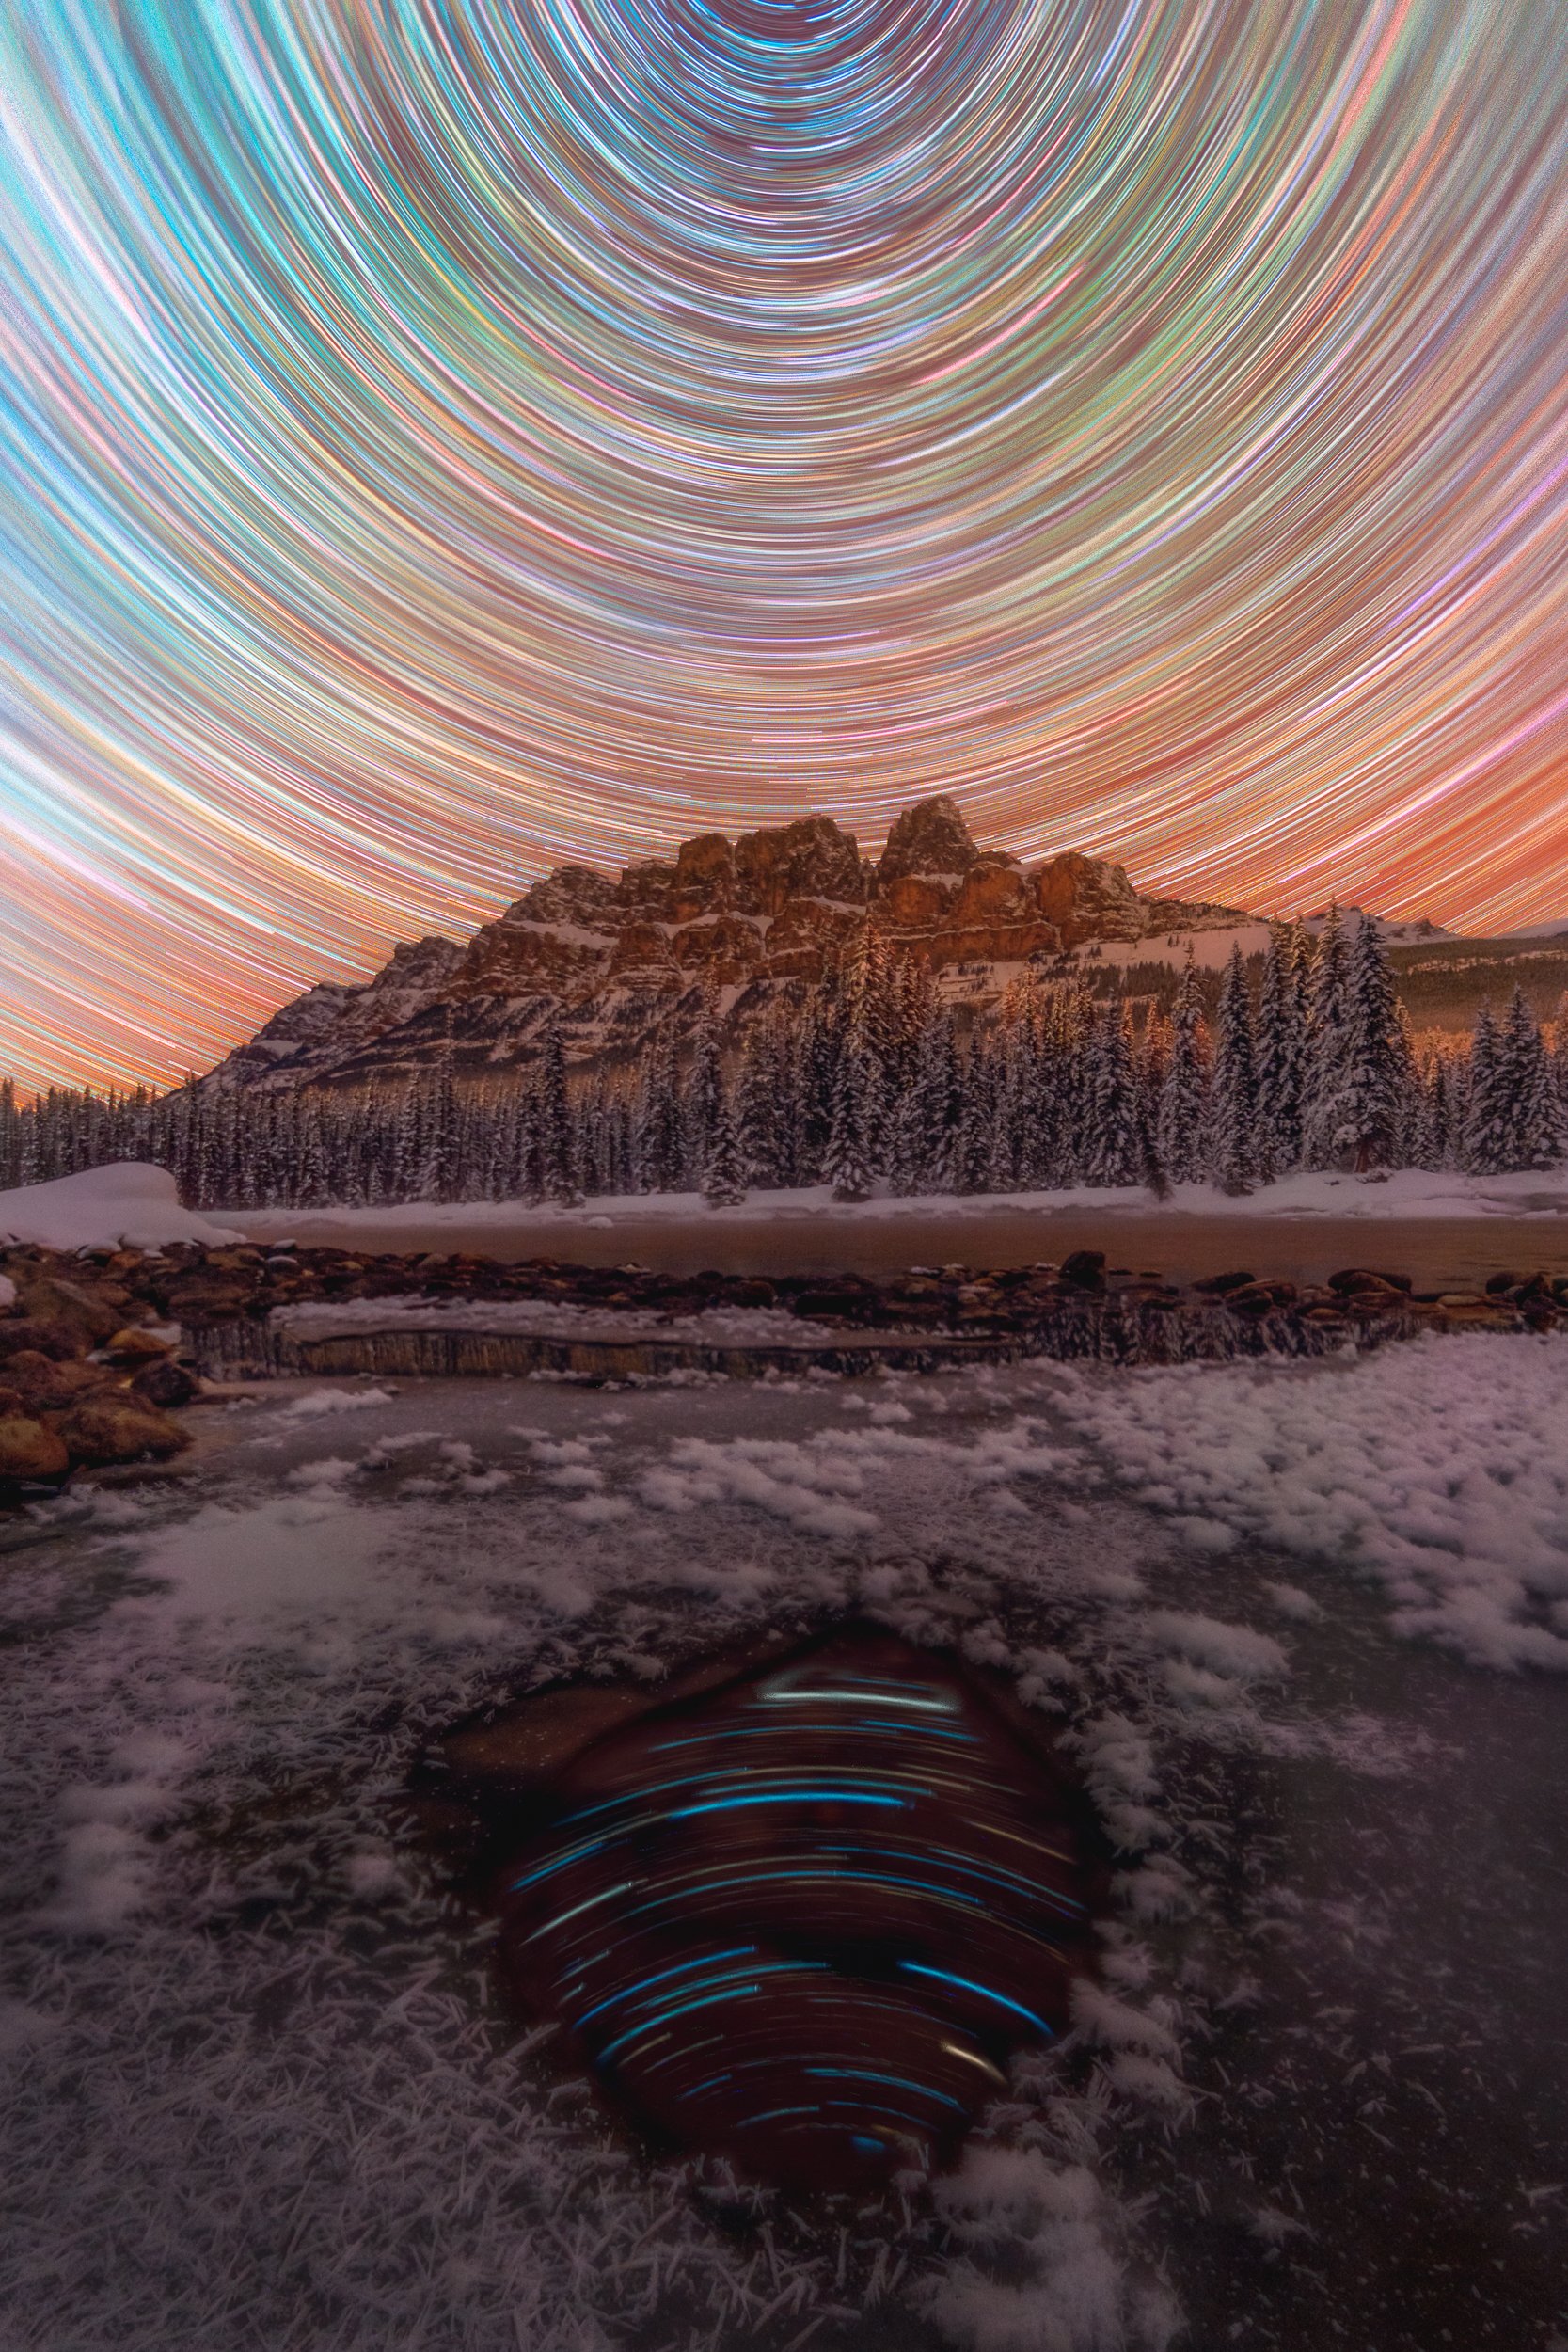
This is my most recent attempt to edit this image, but it won’t be my last. The worst part about taking images like these is just sitting around in the cold, just waiting.
How to Photograph: As I mentioned, there are nearly infinite foreground subjects to find here in winter. As the season progresses the flow of water lessons and new sections of the riverbed are exposed or freeze over, while higher areas eventually get covered with snow. There are always new ice formations amongst the rocks and exploring these features was always one of my favourite parts of shooting here. The contrast in textures and tones between the water, rocks, ice, and snow was also a big draw for me. Many other places in the park have these things, but at this spot they all seem to move harmoniously down the riverbank together as the season progresses.
The wide river with the trees on its banks is a tranquil scene by itself, but when Castle Mountain is included in the background it’s a bit like the cherry on top. If you’re up for the challenge and are properly prepared you could also spend some time exploring the river further to the east or west. I’m sure that with a little planning and time you could come away with a beautiful image that would be entirely unique to you.

I often liked illuminating snow and ice to add interest to scenes. I think my socks got wet from running through the water while trying to get these photos.
How to get there: I’d usually allow 30 minutes to make the drive up the Trans-Canadian Highway towards Castle Mountain, turning off at the exit for ‘Castle Junction’ and Radium Hot Springs. Alternatively you could take the Bow Valley Parkway which runs parallel with the highway. It takes a bit longer but the scenery is much nicer, including some great views of Castle Mountain rising above the tree-lined road ahead of you.
Regardless of how you get there, park on the stretch of road between the highway and parkway, near the steel bridge that crosses the Bow River. On the highway side of the bridge there are gates that give you access to the river bank. Just be sure to close the gates once you’re through.

A cotton candy sunrise that I felt pretty lucky to capture.
Bow Lake
Located along the Icefields Parkway, Bow Lake is just one of many places to stop and explore if you’re traveling between Banff and Jasper. I only made the trek out here a handful of times during my two years in Canada, but it always presented me with stunning colours and beautiful light around golden hour. It’s a lot more remote than others on this list so you shouldn’t run into too many other tourists, although photography groups do stop here even in the middle of winter. Nestled between the lake and Mount Jimmy Simpson is the iconic, red-roofed, Num-Ti-Jah Lodge which is unfortunately closed during winter. Snowshoes are a must for this location.
When to Photograph: During the colder months, and from the shores around the lodge where you’ll likely be, the sun rises over the far end of the lake to the South-East, while sunset occurs to the South-West behind Mount Thompson and Portal Peak. With this in mind I would recommend Bow Lake in the morning as the sun pops up over the mountains at the other end of the valley quite soon after sunrise, whereas during sunset it falls behind the much closer mountains fairly early in the evening. This is not to say that sunsets here aren’t beautiful, but you’re more reliant on the right weather conditions if you’re looking for some colour in your image.

Towards the end of my morning here a couple cross-country skiers headed out for the day. I assumed they were heading towards Bow Glacier which is out of frame to the right.
How to Photograph: First of all, as I mentioned above, snowshoes are a must. The Icefields Parkway gets a lot of snow during winter, and thanks to the low traffic not much of that snow gets compacted enough to form a path. Even if there are paths, they’re quickly covered by fresh snow and it’s very easy to take one wrong step and find yourself up to your waist in powder. So do yourself a favour and bring your snowshoes!
From the public car park it’s only a short walk to the shore of the lake, but depending on the conditions and when you actually go you might find flowing water, a frozen lake, or nothing but mounds of soft snow. If nothing grabs your attention, have a walk around the lodge; during summer there are many winding paths that are now covered by snow but you can still find the little vantage points they lead to.
I personally never found much in the way of interesting ice formations or details around the edge of the lake during my few visits, but what I did find was an abundance of perfect snow. As you walk further from the lodge you can find yourself in a field of gently undulating powder, dotted with small pine trees and their respective tree wells. Thanks to the low number of visitors (let alone visitors with snowshoes) and regular snow, you’ll find this landscape remains a pristine and unique foreground for your images.
Another popular subject for photographers at Bow Lake throughout the year is a short wooden bridge to the south of the lodge. During summer it takes you over a small stream, but in the middle of winter it can look like a sinking ship in an ocean of snow. If you want to photograph it, it can help provide a sense of scale to the scene, or provide leading lines to mountains in the distance.

Soft alpine glow and soft snow. I really liked how the still-trickling stream carved out the snow and gave a lot of depth to the foreground.
How to get there: If you’re making the drive North from Banff it’ll take about an hour to arrive. As you approach you’ll pass a couple pull-outs on your left that provide unique views over the lake, but to actually get down to the lake shore it’s best to pull into the public car park near Num-Ti-Jah Lodge. It’s well signed and the lodge is hard to miss. Thankfully the public toilets at the carpark are usually open.

I took a wide-angle panorama here to help make the space feel bigger than it actually was. A big thanks to Dan for posing.
Panther Falls
If you’re in Banff and you want to see a frozen waterfall, Panther Falls is the way to go. There are others that may be closer to town, or a shorter walk, but they won’t be anywhere near as impressive or awe-inspiring. I will mention however, that the trail to Panther Falls is not signposted, or marked on any maps. As far as I can tell it used to be an official trail, but it isn’t anymore. So to do my due diligence, I strongly urge you to research this place on your own, because out of all of the locations on this list, Panther Falls is the most difficult to get to, and in my opinion presents the greatest threat to your safety.
When to Photograph: Simply, it’s up to you and what’s most convenient. On both occasions I visited it was overcast, and that worked well with the images I took. There was not much sky to be seen from where the camera was and the soft light meant that I didn’t need to bracket my exposures as much as would’ve if there had been direct sun. I can imagine, however, that if you were there during a vibrant sunrise (or even sunset), that you could get a really beautiful contrast between the pink or orange light, and the soft blues of the frozen ice. I can dream. Being here at night could also result in some interesting shots depending on how you use light; Paul Zizka has some really great shots taken here at night with ice climbers ascending the main pillar of the falls, their head torches illuminating the scene.

My friend Dan leading the way to Panther Falls. You could still hear the water rushing inside the pillars of ice.
How to Photograph: You hear it first, but the sound doesn’t prepare you for what you see once you round the last bend in the trail. It’s a massive collection of icy stalagmites and stalactites, and I find images can only attempt to convey its size if a person is in the frame for scale. That said, this is a photographers frozen playground and you’ll be wanting to climb all over and around its ice, so bring crampons.
On the left hand side of the falls a curtain of ice is formed that creates a room with the rock face, at the back of which there is sometimes a window into the centre of the waterfall where the water still falls. Needless to say, don’t accidentally fall in there, that would be bad. On the right hand side of the falls you can get up higher, in a large protected alcove, surrounded by boulders and thick pillars of ice. I found that in most cases, even with a full frame camera and a 16mm lens, I needed to shoot panoramas to capture the sheer size and scale of the falls.
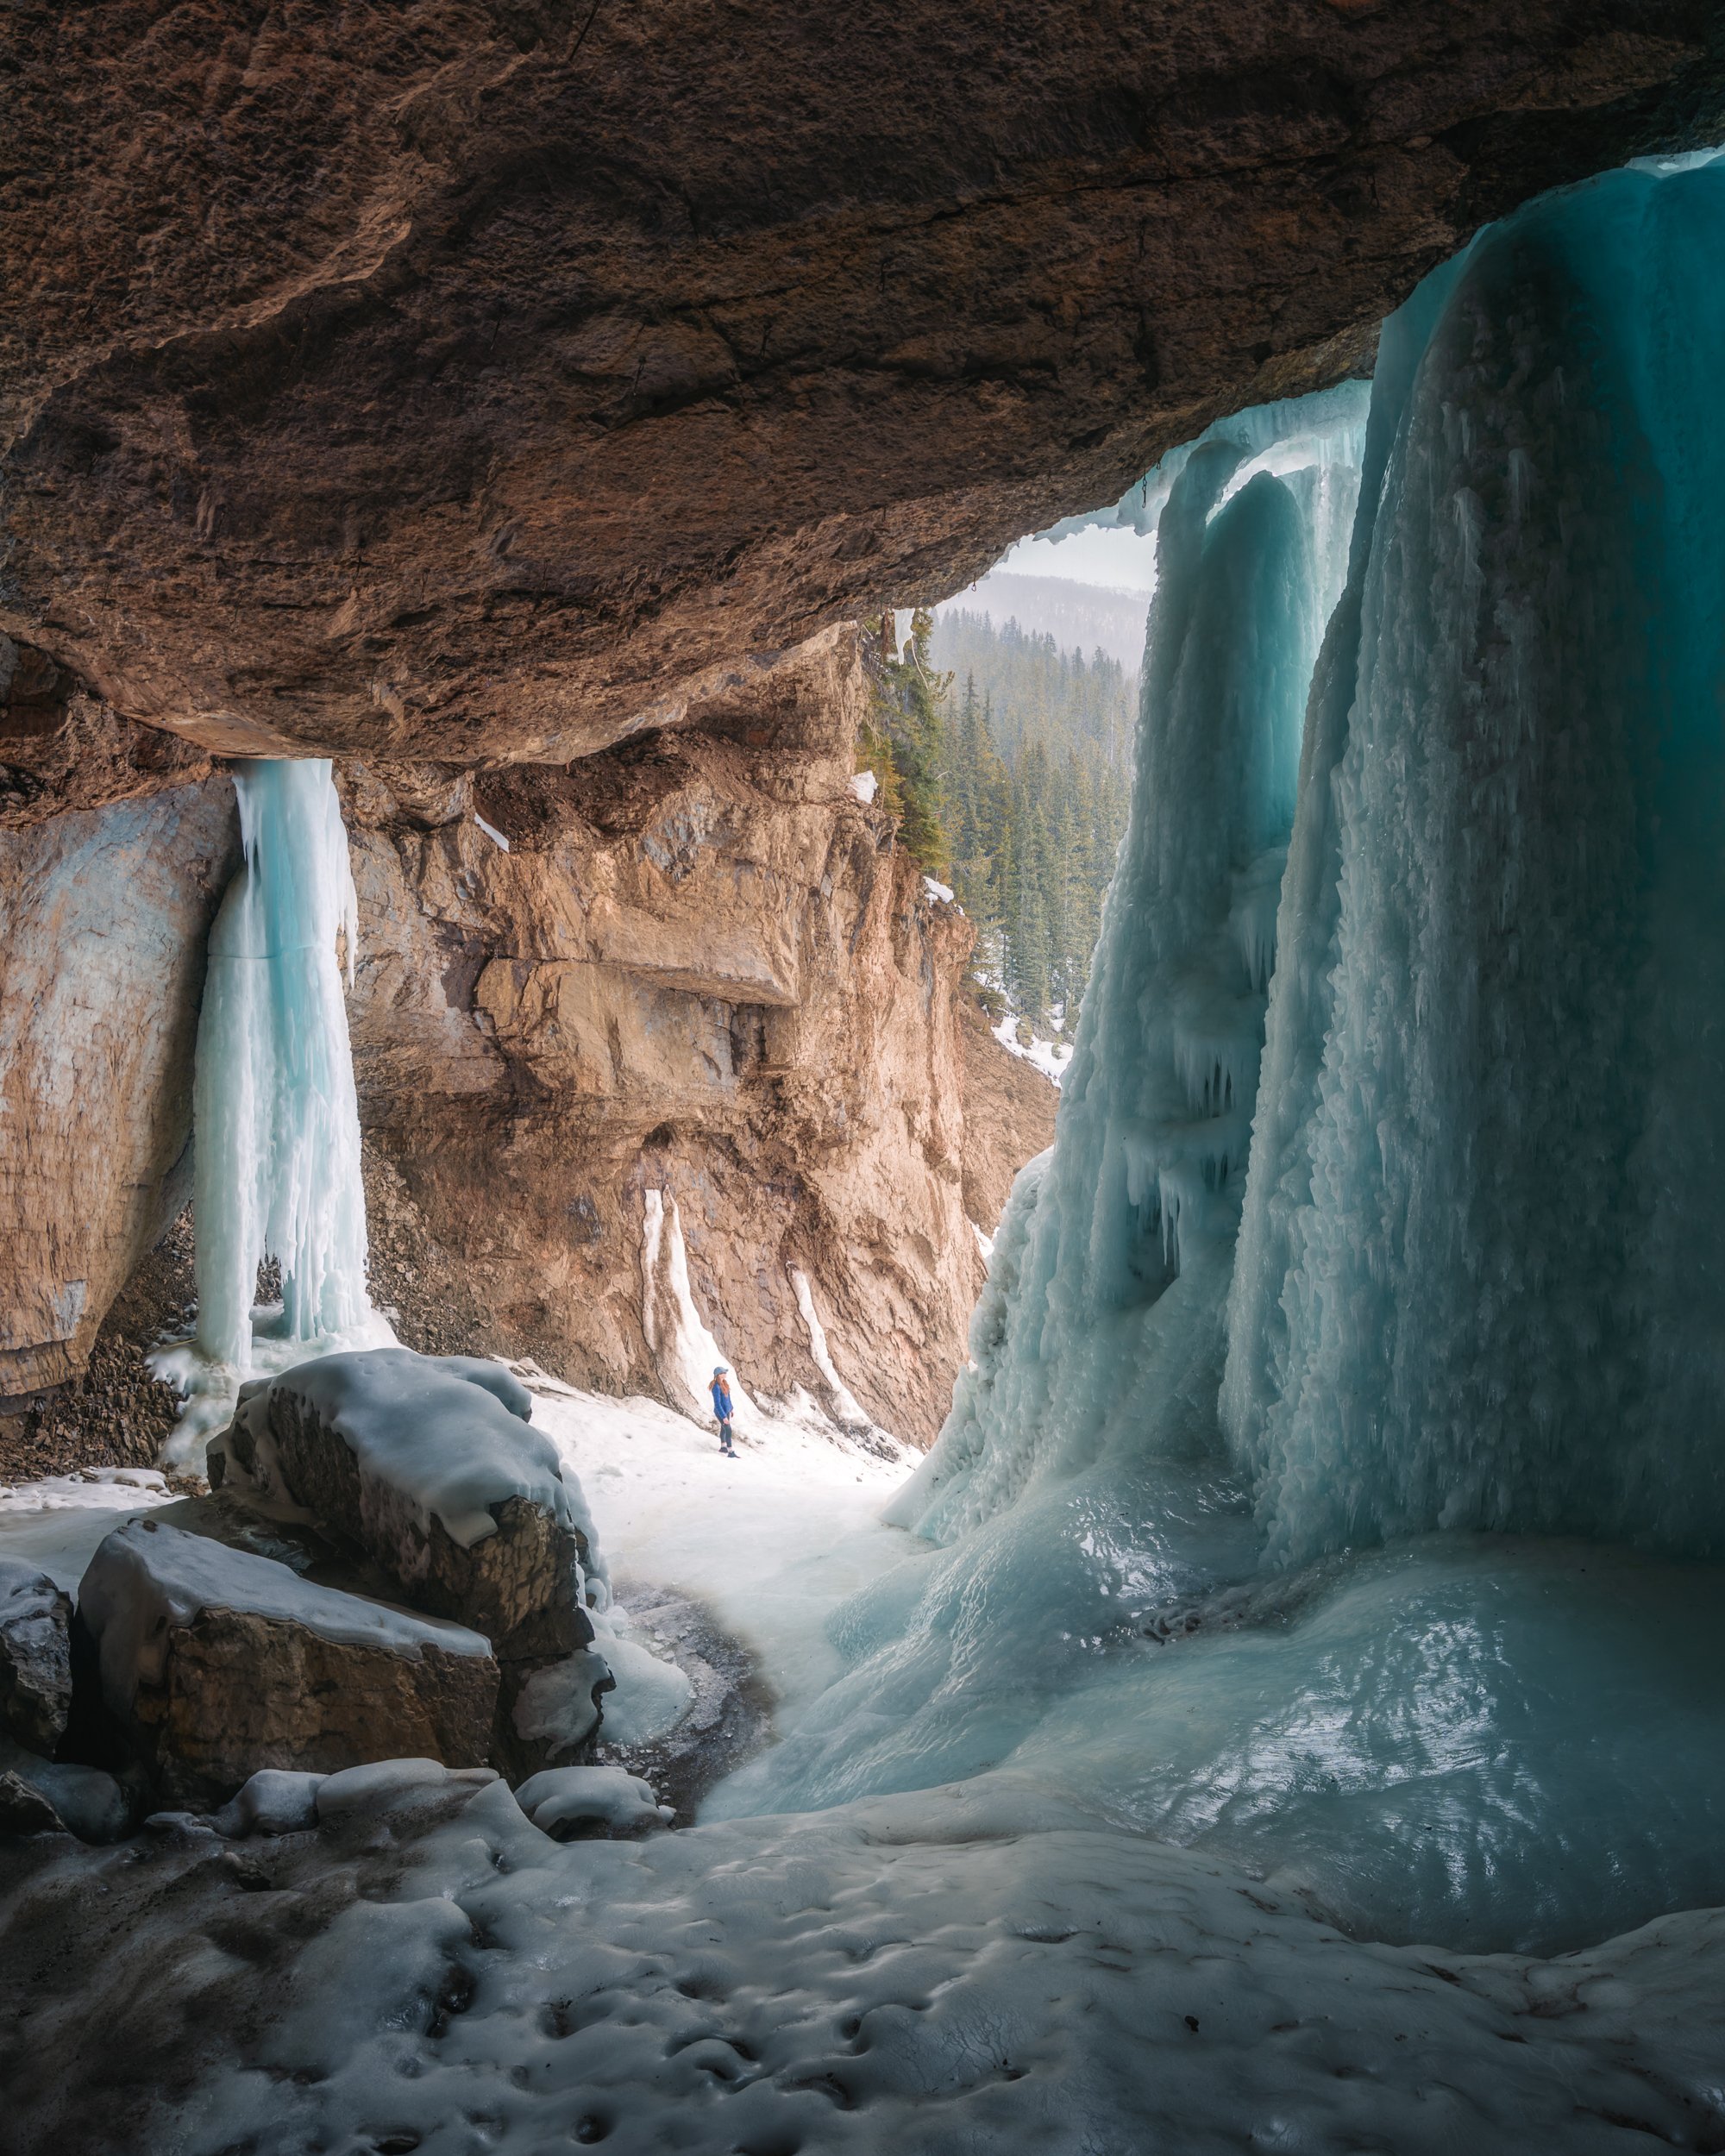
My girlfriend gave a nice sense of scale to this enormous place. The contrast between ice and rock was a focus of many photos.
How to get there: To get to Panther Falls you’re looking at a two hour drive from the town of Banff, up the Icefields Parkway. There are no signs indicating which pullout is the correct one, so it’s best to use your favourite navigation app to show you the way. You’ll be getting close once you head around the ‘big bend’ and start heading up a severely steep section of the Parkway. Once you’re at the top the first pullout on your right will be where you’ll park. With your back to the road you need to head to the right hand corner of the pullout and start heading down the slope into the forest. In summer if you head to the left hand corner you can find a trail to the top of the waterfall, but I’ve never gone this way in winter, and I’m not sure if it’d be safe. Hopefully someone else will have recently been down to the falls, and will have left a path in the snow. If not, once you get a little lower into the trees, you should be able to make out where it goes. Regardless, you’ll soon be doing a handful of uneven switchbacks before ultimately arriving at the falls.
I have visited Panther Falls twice during the winter, and on neither trip did any of us wear snowshoes. It sucked. Do yourself a favour and bring snowshoes so that you can avoid wet socks and a hike that is twice as long and three times as difficult as it needs to be. You’ll also want to bring some quality crampons so that you don’t slip while walking on the ice around the falls.
Honorable Mentions

This image was the last frame from a time lapse that I shot at the top of Sulphur Mountain.
Sulphur Mountain
The town of Banff sits right at the foot of Sulphur Mountain, and unlike pretty much every other peak in Banff (except the ski hills) you can get to the top of this one in a cable car! It does cost, unfortunately, so that’s why it didn’t make one of the top spots (I know you can hike too, but I figured it’s a bit far for this list). The views are great though; an almost 360 degree panorama of mountains in every direction, as far as the eye can see, and amongst it all is the tiny town of Banff.

A view of Mount Rundle, under the stars and over a frozen Two Jack Lake.
Two Jack Lake
If you drive out to Lake Minnewanka you’re guaranteed to pass by Two Jack Lake, and even though it didn’t make the top five you should stop and have a look. I’m certainly biased when I say that Minnewanka is the more impressive of the two lakes, but Two Jack still has a backdrop of mountains, a beautiful shore, and a few different vantage points from which you can photograph. It’s also a quality spot for both sunrises and sunsets.

Probably one of the best places in the world to play a game of hockey.
Lake Louise
I was definitely tossing up whether or not to include Lake Louise with the top spots because while it certainly is a grand, awe-inspiring location, I did find that I was often left wanting for unique perspectives in winter. In summer you’re able to walk up the length of the lake to the glaciers that feed it, and hike up to the ‘beehives’ that look over the lake and the Fairmont Hotel, but after snow falls these areas are closed due to the risk of avalanches. Plus, once the lake freezes then an area for skating is cleared not too far out from the shore and while I didn’t mind photographing skaters there, the landscape photographer in me was a little miffed if they were in my compositions.

One of the most beautiful scenes I’ve ever photographed.
Abraham Lake
This is the one location that isn’t actually in the National Park, but it takes a similar amount of time to get out here as it does to get to Panther Falls so I thought it was only fair I give it some attention. Like many other lakes in this part of the world, when the water freezes here it traps methane bubbles which make for some beautiful foreground interest. The reason Abraham Lake is known so well for them though, is that the incredibly high winds over the ice actually keep most of the snow off for the whole winter. If you’re coming to Banff and you need to photograph those frozen bubbles, Abraham is where you’ll want to go.